補足事項 - pybind11
Map Scanner では探索処理を高速化するために、pybind11 というライブラリを利用しています。
pybind11 は C++11 を Python からお手軽に取り扱うためのヘッダライブラリです。
本ページでは pybind11 の利用方法を解説します。
- GitHub
- Document
開発環境構築
Windows では、Visual Studio 2017 以降のみがサポートされます。
Visual Studio 2017 (MSVC 14.1) で C++17 を使用するには、
pybind11 で標準の準拠を強制 (/permissive-) するためにフラグをコンパイラに渡す必要があります。
Visual Studio 2019 でビルドする場合、厳密には必要ありませんが、設定することを推奨します。
pybind11 のインストール
pybind11 は様々な方法でダウンロードできます。
公式ドキュメントを参考にインストールを実施してください。
Visual Studio の設定
- 新しいプロジェクトを作成します。プロジェクト名とソースファイル名が一致する必要があります。

- 64 ビットの Python ランタイムの場合は、x64 構成をアクティブにします。

- 「プロジェクトの既定値」->「構成の種類」を「ダイナミック ライブラリ (.dll)」に設定します。
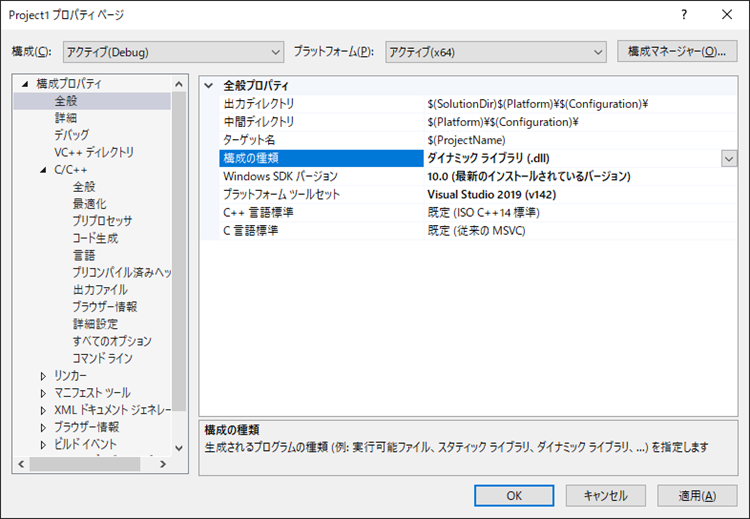
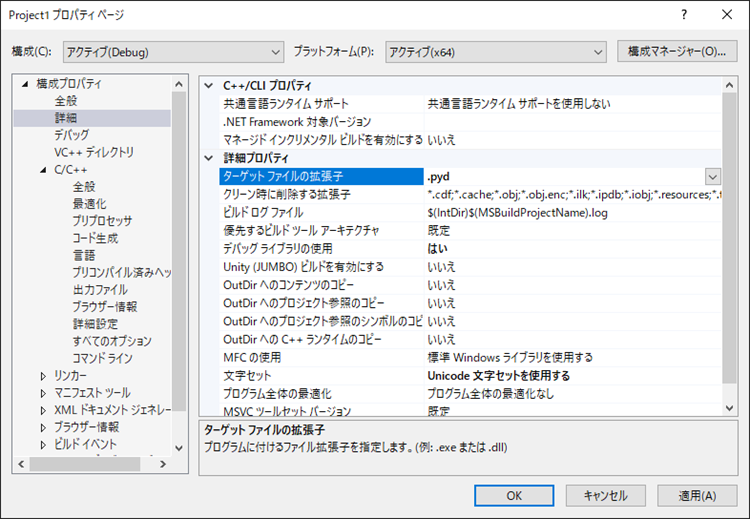
- 「詳細」->「ターゲットファイル拡張子」を「.pyd」に設定します。
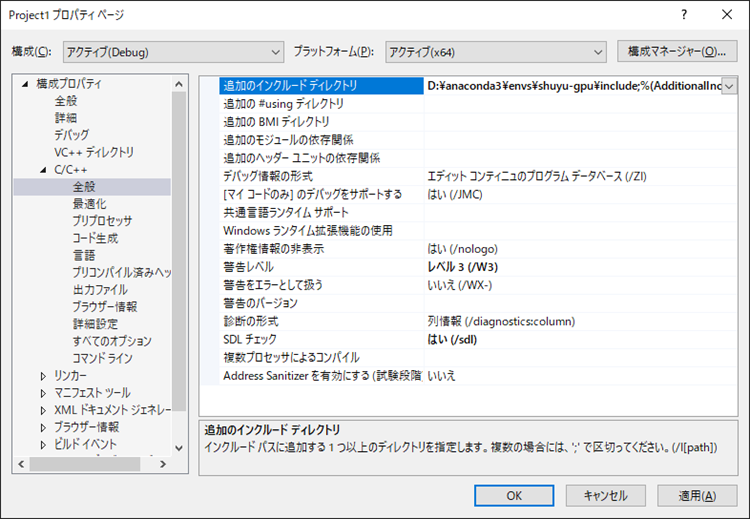
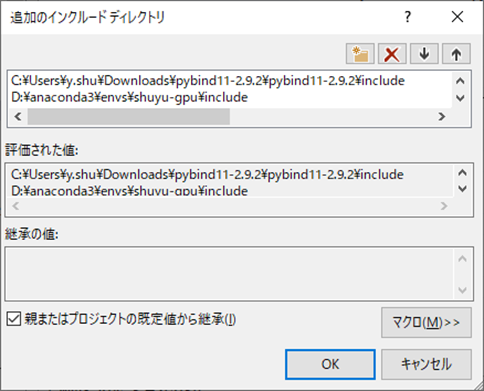
- 「C/C++」->「全般」->「追加のインクルードディレクトリ」に、Python と pybind11 の include パスを入力します。
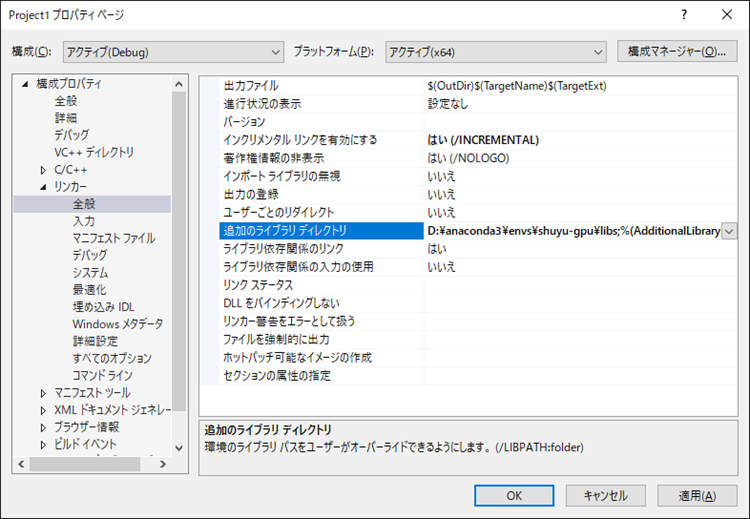
- インストールに合わせて、.lib ファイルが含まれる Python の libs フォルダーを追加します。 (例:
c:\Python36\libs)注意.py ファイルが含まれる Lib フォルダ ではなく、必ず .lib ファイルが含まれる libs フォルダーを指定するようにしてください。
これで Visual Studio の環境設定が完了しました。
C++ と Python の連携
- 非常に単純な関数の Python バインディングを作成することから始めます。以下は 2 つの数値を加算し、その結果を返す関数の例です。

#include <pybind11/pybind11.h>
int add(int i, int j) {
    return i + j;
}
PYBIND11_MODULE(Project1, m) {
    m.doc() = "pybind11 test";
    m.def("add", &add, "A function that adds two numbers");
}
ビルドします。

生成した .pyd ファイルを Python プロジェクトのルートディレクトリに配置し、次のコードを入力して起動します。

import Project1
_sum = Project1.add(1,1)
print(_sum)
以上で C++ と Python 連携が出来ました。
なお、Python から C++ で構築されたクラスを直接インスタンス化することもできます。
#include <pybind11/pybind11.h>
namespace py = pybind11;
using namespace std;

int add(int i, int j) {
    return i + j;
}

class TestClass
{
    float product;
public:
    TestClass(float _product) :product(_product){}
    float multiplication(float input) {
        return input * product;
    }
};


PYBIND11_MODULE(Project1, m) {
    m.doc() = "pybind11 test";

    m.def("add", &add, "A function that adds two numbers");

    py::class_<TestClass>(m, "TestClass")
        .def(py::init<float>())
        .def("multiplication", &TestClass::multiplication)
        ;
}
import Project1
_sum = Project1.add(1,1)
print(_sum)
cl = Project1.TestClass(2.1)
product = cl.multiplication(0.4)
print(product)

配列処理
pybind11 では配列を C++ で操作したり、異なるフォーマットの統一処理を行ったりすることも可能です。
#include <pybind11/pybind11.h>
#include <pybind11/numpy.h>

namespace py = pybind11;

template <typename T>
py::array_t<T> modify_array_inplace(py::array_t<T> x, T a)
{
    auto k = *x.data(1, 1);     // arr 数値の取得
    *x.mutable_data(1, 1) = a;  // arr 数値の変更
    py::print("c_arr:", x);     // Python の形で arr を print できる
    return x;
}


PYBIND11_MODULE(Project1, m)
{
    m.doc() = "pybind11 test";
    m.def("modify_array_inplace", &modify_array_inplace<int32_t>, "");
    m.def("modify_array_inplace", &modify_array_inplace<float_t>, "");
    m.def("modify_array_inplace", &modify_array_inplace<bool>, "");
}
import Project1
import numpy as np

arr = np.zeros((5,5)).astype(int)
_arr = build.modify_array_inplace(arr, 4)
print("p_arr", _arr)

arr = np.zeros((5,5)).astype(bool)
_arr = build.modify_array_inplace(arr, True)
print("p_arr", _arr)

参考
- https://github.com/pybind/pybind11
- https://pybind11.readthedocs.io/en/latest/basics.html
- https://qiita.com/SatoshiTerasaki/items/6e318910cd0060ef301d
- https://risaki-masa.com/use-pybind11/
- https://docs.microsoft.com/ja-jp/visualstudio/Python/working-with-c-cpp-Python-in-visual-studio?view=vs-2019
- https://zenn.dev/t_ibe/articles/400aa60a12434d
- https://www.youtube.com/watch?v=_5T70cAXDJ0